DAQ user guide for Light DAQ
Installation
The basic installation is done on Ubuntu with a version > 22.x. The only necessary service to operate the AX board is the database MongoDB that can be deployed using docker. Nevertheless I describe below the installation of pmdaq framework that can be used for framework handling more than one board. In any case, since all the needed files are distributed on pmdaq git repository, it is necessary to install it (compilation might be optional)
Installation de pmdaq
The default installation is designed to run on a recent version of Linux using Ubuntu (>20.x). Installation on other Linux distributions or on macOS is possible but is not maintained.
Pmdaq is based on two libraries:
- cpprest — the Microsoft C++ framework for REST message exchange (JSON messages with web services). It is used for process control and configuration.
- ZeroMQ — a binary message exchange library used for data collection.
Other libraries are also installed but are mainly related to the hardware used in Lyon. The main ones are:
- libftdi for reading acquisition boards using the USB bus
- netlink++ for reading those using TCP/IP sockets via a Wiznet chip
- paho mqtt the MQTT interface library in C++ and Python provided by Eclipse.
Three steps are required:
- Retrieve the installation script
To simplify the installation of the different software components, a script pmdaq_installer.sh is provided and must be copied into /usr/local/bin:
  wget https://mirabitl.web.cern.ch/daq_install/pmdaq_installer.sh
  chmod +x pmdaq_installer.sh
  sudo cp pmdaq_installer.sh /usr/local/bin
And the available commands can be obtained with:
mirabito@lyosdhcal15:~$ pmdaq_installer.sh -h
Usage :
    -D                  : Update and install needed debian packages
    -M                  : Update and install needed brew packages on apple MACOS
    -C                   : Update and compile pmdaq
    -p                        : Build the distribution packages.
    -h                        : print this message.
BUILDDIR is set
Build is in /home/mirabito/Build  /home/mirabito/Build
number of processor 4
As can be seen in this example, an environment variable BUILDIR must be defined to specify where the compilation should take place:
mkdir -p ${HOME}/build
export BUILDIR=${HOME}/build
- Install the required packages
pmdaq_installer.sh -D
- Compile and install the code in
/usr/local/pmdaq
pmdaq_installer.sh -C
This command:
-
Creates the directory /opt/pmdaq if it does not exist and downloads the git repository of pmdaq
-
Updates the directory /opt/pmdaq and launches the required compilations using cmake
The following installation is then obtained in /usr/local/pmdaq
    /usr/local/pmdaq/
    ├── bin
    │   ├── combdaq
    │   ├── daq_webaccess
    │   ├── daq_webaccess.service
    │   ├── daq_webaccess_service_daemon
    │   ├── dbt
    │   ├── mga
    │   ├── mgjob
    │   ├── mgmqtt
    │   ├── mgroc
    │   ├── mgslow
    │   ├── mg_webaccess
    │   ├── mg_webaccess.service
    │   ├── mg_webaccess_service_daemon
    │   ├── pmd
    │   ├── pmdaemon
    │   ├── pmdaq_service_daemon
    │   ├── pnsdaemon
    │   ├── pnse
    │   ├── pns_service_daemon
    │   ├── scannet
    │   └── slowctrl
    ├── etc
    │   ├── Log4cxxConfig.xml
    │   ├── pmdaq.bashrc
    │   ├── pmdaq.conf
    │   ├── pmdaq.service
    │   ├── pns.conf
    │   └── pns.service
    ├── lib
    │   ├── libapp_demo.so
    │   ├── libapp_genesys.so
    │   ├── libapp_syx27.so
    │   ├── libapp_wiener.so
    │   ├── libapp_zup.so
    │   ├── libevb_builder.so
    │   ├── libevb_producer.so
    │   ├── libevb.so
    │   ├── libgrStore.so
    │   ├── liblyon_db.so
    │   ├── liblyon_dif.so
    │   ├── liblyon_febv1.so
    │   ├── liblyon_febv2.so
    │   ├── liblyon_gricv0.so
    │   ├── liblyon_gricv1.so
    │   ├── liblyon_ipdc.so
    │   ├── liblyon_liboard.so
    │   ├── liblyon_mbdaq0.so
    │   ├── liblyon_mbmdcc.so
    │   ├── liblyon_mdcc.so
    │   ├── liblyon_mpi.so
    │   ├── liblyon_pmr.so
    │   ├── liblyon_ptdc.so
    │   ├── liblyon_sdcc.so
    │   ├── liblyon_shm_data_source.so
    │   ├── liblyon_wbmdcc.so
    │   ├── liblyon_wizcc.so
    │   ├── liblyon_wtricv0.so
    │   ├── liblyon_wtricv1.so
    │   ├── libmgStore.so
    │   ├── libmqttStore.so
    │   ├── libpmdaq.so
    │   ├── libpns.so
    │   ├── libproc_binarywriter.so
    │   ├── libproc_dummywriter.so
    │   └── libproc_shmwriter.so
    └── share
        ├── combrc.py
        ├── combrc_threaded.py
        ├── daqrc.py
        ├── mbmdcc.py
        ├── MongoAsic.py
        ├── MongoHR2.py
        ├── MongoJob.py
        ├── MongoLiroc.py
        ├── MongoMqtt.py
        ├── MongoMROC.py
        ├── MongoPR2.py
        ├── MongoRoc.py
        ├── MongoSlow.py
        ├── pmdaqrc.py
        ├── pnsAccess.py
        ├── prettyjson.py
        ├── rcslow.py
        ├── serviceAccess.py
        ├── session.py
        └── xml2mongo.py
Install the FEB software in /usr/local/pmdaq
This is compulsory since it installs the python database software
cd /opt/pmdaq/cms_febv2
source install.sh
Docker and MongoDB installation
Installation et configuration de docker
Remarks
The following description installs MongoDB, graphite, Grafana, Mosquitto and apache services. For the light DAQ only the MongoDB one is needed and the compose YAML file can be modified accordingly.
The RXXXX8 password must be replaced by your choice.
Installation
One should use the script docker-install.sh dans /opt/pmdaq/docker:
#!/bin/bash
sudo apt update
sudo apt upgrade -y

# Add Docker's official GPG key:
sudo apt-get update
sudo apt-get install ca-certificates curl gnupg
sudo install -m 0755 -d /etc/apt/keyrings
curl -fsSL https://download.docker.com/linux/ubuntu/gpg | sudo gpg --dearmor -o /etc/apt/keyrings/docker.gpg
sudo chmod a+r /etc/apt/keyrings/docker.gpg

# Add the repository to Apt sources:
echo \
  "deb [arch="$(dpkg --print-architecture)" signed-by=/etc/apt/keyrings/docker.gpg] https://download.docker.com/linux/ubuntu \
  "$(. /etc/os-release && echo "$VERSION_CODENAME")" stable" | \
  sudo tee /etc/apt/sources.list.d/docker.list > /dev/null
sudo apt-get update

sudo apt-get install docker-ce docker-ce-cli containerd.io docker-buildx-plugin docker-compose-plugin -y
It installs docker and the plugincompose`
that allows to use the YAML file /opt/pmdaq/docker/docker-compose.yml
version: "3.8"
services:
  mongodb:
    image : mongo:6-jammy
    container_name: mongodb
    environment:
      - PUID=1000
      - PGID=1000
      - MONGO_INITDB_ROOT_USERNAME=root
      - MONGO_INITDB_ROOT_PASSWORD=RXXXX8
    volumes:
      - /data/mongo/database:/data/db
    ports:
      - 27017-27019:27017-27019
    restart: unless-stopped
  mosquitto:
    image : eclipse-mosquitto
    container_name: mosquitto
    environment:
      - PUID=1000
      - PGID=1000
    volumes:
      - /data/docker-mosquitto/mosquitto:/mosquitto
      - /data/docker-mosquitto/mosquitto/data:/mosquitto/data
      - /data/docker-mosquitto/mosquitto/log:/mosquitto/log
    ports:
      - 1883:1883
      - 8883:8883
      - 8080:8080
      - 9001:9001
    restart: unless-stopped
  graphite:
    image : graphiteapp/graphite-statsd
    container_name: graphite
    environment:
      - PUID=1000
      - PGID=1000
    volumes:
      - /data/graphite/storage:/opt/graphite/storage
    ports:
      - 80:80
      - 2003-2004:2003-2004
      - 2023-2024:2023-2024
      - 8126:8126
      - 8125:8125/udp
    restart: unless-stopped
  grafana:
    image: grafana/grafana:8.4.4
    container_name: grafana-server
    restart: unless-stopped
    environment:
      - GF_SECURITY_ADMIN_USER=admin
      - GF_SECURITY_ADMIN_PASSWORD=RXXXXX8
      - GF_PLUGINS_ALLOW_LOADING_UNSIGNED_PLUGINS=grafana-mqtt-datasource
    ports:
      - 3000:3000
    volumes:
      - /data/docker-grafana/grafana_plugins:/var/lib/grafana/plugins
      - /data/docker-grafana/grafana_data:/var/lib/grafana
  apache:
    image: httpd:2.4
    container_name: mon_apache
    ports:
      - 7070:80
    volumes:
      - /usr/local/pmdaq/htdocs:/usr/local/apache2/htdocs/
    restart: always
To use it, some directories in /data should be created:
-
/data/docker-mosquitto/mosquitto/{data,log,config} -
Le directory config should contains the following file :
/data/docker-mosquitto/mosquitto/config/mosquitto.conf
# following two lines required for > v2.0
allow_anonymous true
listener 1883
listener 8080
protocol websockets
connection_messages true
log_timestamp true
persistence true
autosave_interval 600
allow_zero_length_clientid true
persistence_location /mosquitto/data/
log_dest file /mosquitto/log/mosquitto.log
-
/data/graphite/storage -
/data/docker-grafana/{grafana_plugins,grafana_data} -
/data/mongo/database
Starting or stopping the containers is done with:
cd /opt/pmdaq/docker
# Start
docker compose up -d
#List
docker ps
#Stop
docker compose down
Configuration of MongoDB
This step is also compulsory, it allows to define the path to access the DB from the acquisition programs
Tools needed
mongosh, mongodump et mongorestore
wget https://repo.mongodb.org/apt/ubuntu/dists/noble/mongodb-org/8.0/multiverse/binary-amd64/mongodb-org-server_8.0.9_amd64.deb
sudo apt install -y mongodb-mongosh
wget -qO- https://www.mongodb.org/static/pgp/server-8.0.asc | sudo tee /etc/apt/trusted.gpg.d/server-8.0.asc
echo "deb [ arch=amd64,arm64 ] https://repo.mongodb.org/apt/ubuntu noble/mongodb-org/8.0 multiverse" | sudo tee /etc/apt/sources.list.d/mongodb-org-8.0.list
sudo apt install -y mongodb-mongosh
sudo apt install mongodb-database-tools
Creating database
First connect to MongoDB:
mongosh -u root -p --host mypc --port 27017
Then for each base (MYBASE,MYBASE_TEST ...), create a user with:
> use MYBASE
> db.createUser({ user:'acqilc', pwd:'RXXXXX8', roles: [{ role:'readWrite',db:'MONROC'}]})
Once done, the database MYBASE can be accessed on mypc on port 27017 using the user name acqilc and the password RXXXX8
Backups
Backup
mongodump --forceTableScan --host lyoilcdaq01 --port 27017 --username acqilc --password Rzzzzz8 --db SLOW --authenticationDatabase SLOW --out /data/backup/
Restore
mongorestore --host lyoilcdaq01 --port 27017 -u acqilc --authenticationDatabase PICMIC --db PICMIC picmic/PICMIC
Remarks
- You can change the database name with:
   mongodump --db ancienne_base
   mongorestore --nsFrom="ancienne_base.*" --nsTo="nouvelle_base.*" dump/
- A minimal backup can be achieve with
crontabandrsyncto nearby computers. The real solution is to use replication mechanisms of MongoDB that requires a deeper deployment.
25 16 * * * mongodump --forceTableScan --host lyoilcdaq01 --port 27017 --username acqilc --password Rzzzzz8 --db LYONROC  --authenticationDatabase LYONROC  --out /data/backup/
30 16 * * * mongodump --forceTableScan --host lyoilcdaq01 --port 27017 --username acqilc --password Rzzzzz8 --db PICMIC  --authenticationDatabase PICMIC  --out /data/backup/
35 16 * * * mongodump --forceTableScan --host lyoilcdaq01 --port 27017 --username acqcmsmu --password OzzzzzI --db FEBROC  --authenticationDatabase FEBROC  --out /data/backup/
40 16 * * * mongodump --forceTableScan --host lyoilcdaq01 --port 27017 --username acqilc --password Rzzzzz8 --db SLOW  --authenticationDatabase SLOW  --out /data/backup/
50 16 * * * rsync -axv /data/backup/ acqcmsmu@lyocmsmu06:/data/backup
52 16 * * * rsync -axv /data/backup/ acqilc@lyoilc07:/data/backup
AX7325B driver installation
The driver is developed and maintained by Loup Balleyguier in Lyon. Both code and firmware can be downloaded from the git directory:
https://gitlab.in2p3.fr/l.balleyguier/cms-irpc-feb-lightdaq.git
If you don't have account on gitlab, please contact the developer to get access.
A snapshot of the version used in Lyon can be installed with:
 cd ${HOME}
 tar zxvf /opt/pmdaq/cms_febv2/axboard/driver/axboard_driver.tgz
It is fully python based and does not need additional packages except those provided by the pip installer.
In order to use acquisition software with graphical interface and analysis the following package should be installed in a virtual environment:
# install virtual env support
sudo apt install python3-venv
# Create one
python -m venv testtkenv
# activate it
source testtkenv/bin/activate
# Install needed packages
pip3 install ttkbootstrap matplotlib numpy zstd zstandard pymongo pyvisa pyvisa_py requests termcolor transitions matplotlib
User software and environment settings
In order to operate the software some library and software path should be set. The access to the MongoDB database is also define via an environment variable
MGDBLOGIN=user/pwd@pchost:port@database
with the example account and DB we created before:
MGDBLOGIN=acqilc/RXXXX8@mypc:27017@MYBASE
The following script should be modified (account,pc and DB names) and saved to a daq_env.sh file:
### python virtual env
source testtkenv/bin/activate
### Shared library
export LD_LIBRARY_PATH=/opt/cactus/lib/:/usr/local/pmdaq/lib/:/usr/local/cms_febv2/lib:$LD_LIBRARY_PATH
### DB access
export MGDBLOGIN=acqcmsmu/OpacIP2I@lyoilcdaq01:27017@FEBROC

### Software locations
export DAQSW=/opt/pmdaq/cms_febv2/axboard
export DAQFEB=/usr/local/cms_febv2
export HW_DRV=${HOME}/cms-irpc-feb-lightdaq/software

### PYTHON and executable path
export PYTHONPATH=${HW_DRV}:${DAQSW}/db/:${DAQSW}/bin/:${DAQSW}/share/:${DAQFEB}/db:$PYTHONPATH
export PATH=${DAQFEB}/db/:${DAQFEB}/bin:${DAQSW}/bin/:${DAQSW}/share/:${DAQSW}/tk/:$PATH
This definition file must be sourced before any daq operation. the following line can be added at the end of your .bashrc file:
source daq_env.sh
Database tools
These tools are important because they give the capability to construct a coherent set of parameters to operate the FEBs.
Creating a state
Using the DB defined in the MGDBLOGIN variable, the software to access the db is a python module installed /usr/local/cms_febv2/db , the cvs_register_access.
In the following example, it creates a new state FEBV330_V48 with one FEB (30) and store it in the DB (version 1)
import csv_register_access as cra
s=cra.instance()
s.create_setup ("FEBV330_V48")
f1=cra.febv2_registers(30)
# Create a FEB with default parameters
f1.load_defaults(fna="/usr/local/cms_febv2/etc/default_fpga.csv",fnp="/usr/local/cms_febv2/etc/default_petiroc.csv")
s.setup.add_febv2(f1)

fp1=s.setup.febs[0]
fp1.set_fpga_version("4.8")

s.upload_changes("state with one FEB v3 (FPGA 4.8) (30) for Dome Test CCOMP 10 DELAY 4 No PF No Mitig No pedestal")
All parameters are stored in two csv files. Examples and default values are given in the previous script:
# FPGAs /usr/local/cms_febv2/etc/default_fpga.csv
# PETIROCS /usr/local/cms_febv2/etc/default_petiroc.csv
with columns corresponding to the parameter name and the 3 FPGAs (LEFT,MIDDLE,RIGHT) or the 6 PETIROCs (LEFT_TOP,LEFT_BOT....RIGHT_BOT) .The lines correspond to the parameter name and their values
In the default set of parameters created, for PETIROC:
-
All channels of FEBV2_R3 are activated
-
The channels DAC 6-bit are all set to 32
-
PA_CCOMP are set to 10
-
auto reset delay is 4
and for FPGA TDCs:
-
All channels time offset are set to 0
-
Pair filtering is disable and limits not set for all channels
-
Re-triggering mitigation is turned off
Updating a state
The methods available in csv_register_access can be listed with
import csv_register_access as cra
help(cra)
Once a setup is downloaded both FPGA and PETIROC csv data can be accessed with the set_parameter method of each chip.
The following script gives an example on how to use it for both chips:
import csv_register_access as cra
# Create an access to the DB
s=cra.instance()
# download a version
s.download_setup("FEBV330_V47",6)
# Access PETIROC data
p=s.setup.febs[0].petiroc
# Change CCOMP for all 6 ASICS
p.set_parameter("pa_ccomp",8,asic=None)

# Access the FPGA data
f=s.setup.febs[0].fpga

# Disable pair filtering. In this case a special method is provided to do it with the channel number
for i in range(16):
    f.set_pair_filtering_en(i,0,"LEFT")
    f.set_pair_filtering_en(i,0,"MIDDLE")
    f.set_pair_filtering_en(i,0,"RIGHT")
# Disable the re-triggering mitigation
f.set_parameter("DATA_PATH_CTRL.RETRIG_MITIG_THRESHOLD.COUNT",15,fpga=None)
f.set_parameter("DATA_PATH_CTRL.RETRIG_MITIG_MUTEROC_TIME.STEP_120MHz",0,fpga=None)
# Upload changes to a new state. The first available number for state FEBV330_V47 will be used
s.upload_changes("PA_CCOMP set to 8 No PF no MITIGATE")
Critical parameters for PETIROC
There is few critical parameters that should be adjusted to run. Some are tuned by the calibration procedures (pedestal adjustment), the others define the operation mode.
| Name | Role | Comment |
|---|---|---|
| mask_discri_time_ch | mask of a channel | Method provided |
| 6b_dac_ch | DAC of channel. Allows to align pedestal of all channels of a given chip. It is automatically set by the calibration procedure | Method provided |
| 10b_dac_vth_discri_time | 10bit DAC threshold common to a chip. It is set to the pedestal of a chip by the calibration procedure. An additional shift should be applied for data taking | Methods are provided to set it or shift it. |
| pa_ccomp | Value of the capacitors set at the preamplifier stage. It changes the rise time and so affect the calibration. | |
| delay_reset_trigger / en_reset_trigger_delay | delay of the channel reset and associated switch | Critical to limit dead time. The steps are of 6 ns and a minimal value is 4. |
Critical parameters for FPGA
Channel delays
Each TDC channel has a different delay, related to the FEB routing and mainly TDC calibration. In order to take this into account there is one parameter TDC_TS_CORRECTION.CHANxx_TS_OFFSET that can be adjusted for each xx channel. It is achieved during the calibration TIMING procedure.
Pair filtering
One important feature of the FEB is its capability to filter signal arriving on both side of the strip. To do this one should set a minimal and a maximal delay between the 2 ends of the strip, taking into account the PCB length. I made the calculation for both chambers type and gives here the needed scripts:
RE31 for FEB on the left (top view)
dt_min=[1.87,1.97,2.06,2.10,2.28,2.40,2.54,2.67,2.77,2.96,3.10,3.24,3.39,3.53,3.67,3.81,3.96,4.10,4.24,4.39,4.53,4.67,4.81,4.95,5.10,5.24,5.38,5.52,5.66,5.80,5.94,6.08,6.23,6.37,6.51,6.65,6.79,6.92,7.02,7.11,7.18,7.22,7.26,7.26,7.25,7.25,7.25,7.24];
dt_max=[18.23,18.52,18.80,19.07,19.32,19.50,19.70,19.89,20.06,20.24,20.37,20.50,20.64,20.78,20.91,21.04,21.18,21.32,21.45,21.59,21.73,21.86,22.00,22.13,22.27,22.41,22.54,22.68,22.82,22.95,23.09,23.23,23.36,23.50,23.64,23.78,23.91,24.04,24.14,24.23,24.30,24.33,24.37,24.37,24.37,24.36,24.36,24.35]

fpgas=["RIGHT","MIDDLE","LEFT"]
for i0 in range(48):
    i_s=47-i0
    f_s=i_s//16
    s_t=i_s%16
    ti=int((dt_min[i0]-1.)/(2.5/256))
    ta=int((dt_max[i0]+1.)/(2.5/256))
    print(f'f.set_pair_filtering_en({s_t},1,"{fpgas[f_s]}")')
    print(f'f.set_pair_ts_diff_min({s_t},{ti},"{fpgas[f_s]}")')
    print(f'f.set_pair_ts_diff_max({s_t},{ta},"{fpgas[f_s]}")')
RE41 for FEB on the left (top view)
#Parsing of RE41_LEFT
dt_min=[1.56,1.71,1.75,1.80,1.98,2.11,2.23,2.37,2.54,2.69,2.84,2.99,3.13,3.28,3.43,3.58,3.73,3.87,4.03,4.17,4.32,4.47,4.62,4.77,4.91,5.06,5.21,5.36,5.50,5.65,5.80,5.94,6.09,6.24,6.39,6.53,6.68,6.82,6.92,7.03,7.09,7.14,7.19,7.19,7.20,7.20,7.24,7.25];
dt_max=[14.98,15.34,15.59,15.88,16.14,16.35,16.54,16.76,16.92,17.06,17.20,17.34,17.48,17.63,17.77,17.91,18.06,18.19,18.34,18.47,18.62,18.77,18.91,19.05,19.20,19.34,19.48,19.63,19.77,19.91,20.06,20.20,20.34,20.49,20.64,20.77,20.92,21.06,21.16,21.26,21.33,21.37,21.42,21.43,21.43,21.43,21.47,21.48];
#Parsing of RE31_LEFT
#dt_min=[1.87,1.97,2.06,2.10,2.28,2.40,2.54,2.67,2.77,2.96,3.10,3.24,3.39,3.53,3.67,3.81,3.96,4.10,4.24,4.39,4.53,4.67,4.81,4.95,5.10,5.24,5.38,5.52,5.66,5.80,5.94,6.08,6.23,6.37,6.51,6.65,6.79,6.92,7.02,7.11,7.18,7.22,7.26,7.26,7.25,7.25,7.25,7.24];
#dt_max=[18.23,18.52,18.80,19.07,19.32,19.50,19.70,19.89,20.06,20.24,20.37,20.50,20.64,20.78,20.91,21.04,21.18,21.32,21.45,21.59,21.73,21.86,22.00,22.13,22.27,22.41,22.54,22.68,22.82,22.95,23.09,23.23,23.36,23.50,23.64,23.78,23.91,24.04,24.14,24.23,24.30,24.33,24.37,24.37,24.37,24.36,24.36,24.35]

fpgas=["RIGHT","MIDDLE","LEFT"]
for i0 in range(48):
    i_s=47-i0
    f_s=i_s//16
    s_t=i_s%16
    ti=int((dt_min[i0]-1.)/(2.5/256))
    ta=int((dt_max[i0]+1.)/(2.5/256))
    print(f'f.set_pair_filtering_en({s_t},1,"{fpgas[f_s]}")')
    print(f'f.set_pair_ts_diff_min({s_t},{ti},"{fpgas[f_s]}")')
    print(f'f.set_pair_ts_diff_max({s_t},{ta},"{fpgas[f_s]}")')
Those scripts gives you the command to set diff_min , diff_max and filtering_en for each channel. this depend uniquely on PCB geometry. A DAQ with a given DB state and version that would like to enable this feature on operation should be updated with those parameters and be updated to a new version.
remark
When making calibration (S-Curves or Timing) the filtering should be disabled. Example
import csv_register_access as cra
s=cra.instance()
s.download_setup("FEBV330_V47",49)
f=s.setup.febs[0].fpga

for i in range(16):
    f.set_pair_filtering_en(i,0,"LEFT")
    f.set_pair_filtering_en(i,0,"MIDDLE")
    f.set_pair_filtering_en(i,0,"RIGHT")
# Disable Mitigation
f.set_parameter("DATA_PATH_CTRL.RETRIG_MITIG_MUTEROC_TIME.STEP_120MHz",0,fpga=None)
s.upload_changes(" Disable pair filtering to study pedestal ")
Re-triggering mitigation
In order to avoid oscillation of the discriminators (re-triggering) a mitigation mechanism is implemented in the FPGAs based on 3 parameters. It takes into account the reset delay used for PETIROC (typically 8)
- A counter increments TDC hits at FPGA level. It is decremented at a period set by the parameter RETRIG_MITIG_DECREMENT_TIME.STEP_120MHZ = 20 (162 ns)
- If the counter exceed a threshold RETRIG_MITIG_THRESHOLD.COUNT=3 The 2 PETIROC asics are muted with VAL_EVENT signal for RETRIG_MITIG_MUTEROC_TIME.STEP_120MHZ=7 (60 ns)
Each trigger on a channel induces a dead time of = 54 ns.
In case of triggering of this mechanism the dead time is 222 ns and the decrement time of 162 ns is enough
If a re-triggering event occurred the loss is limited to 222 ns instead of 89 μs if the whole orbit is concerned. When using pair filtering, the detection is active before the pair filtering algorithm and will stop oscillation even only one ASIC is affected.
To activate the mechanism one should modify the DB state used with
import csv_register_access as cra
s=cra.instance()
s.download_setup("FEBV330_V47",6)

# Set delay of reset on PETIROC
p=s.setup.febs[0].petiroc
p.set_parameter("delay_reset_trigger",8,asic=None)
f=s.setup.febs[0].fpga

# Enable pair filtering
for i in range(16):
    f.set_pair_filtering_en(i,1,"LEFT")
    f.set_pair_filtering_en(i,1,"MIDDLE")
    f.set_pair_filtering_en(i,1,"RIGHT")

# Activate mitigation
f.set_parameter("DATA_PATH_CTRL.RETRIG_MITIG_THRESHOLD.COUNT",3,fpga=None)
f.set_parameter("DATA_PATH_CTRL.RETRIG_MITIG_MUTEROC_TIME.STEP_120MHz",7,fpga=None)
f.set_parameter("DATA_PATH_CTRL.RETRIG_MITIG_DECREMENT_TIME.STEP_120MHz",20,fpga=None)
s.upload_changes("Auto Reset  8 Mitigation 3/7/20 Pair Filtering")
Command line: febdbtool
Previous tools were provided to create or modify database states but tools are also needed to download these states in a readable way and to provide csv files to the FEB driver. We also need methods to list the various states created. Eventually some bookkeeping data should also be stored and versioned:
- runs: Stored with a run number incremented in the DB and with a comment
- tests: Results of S-Curves or Timing procedure
- configurations: Any acquisition needs additional configuration parameters (Chips DB version, specific mode or thresholds...)
The python module gives the method to do it but one can also use the command line tools febdbtool:
$ febdbtool -h
usage: febdbtool [-h]
                 [--states | --tests | --runs | --configurations | --asic-info | --fpga-info | --upload | --acq-upload | --scurves | --download | --acq-download]
                 [--state STATE] [--version VERSION] [--feb FEB] [--fpga-file FPGADEF] [--asic-file ASICDEF]
                 [--file CONFIG_FILE] [--comment COMMENT] [--param PARAM] [--analysis ANALYSIS] [--asic ASIC] [--name NAME]
                 [--out OUT]

optional arguments:
  -h, --help           show this help message and exit
  --states             List all the available states
  --tests              List all the available tests
  --runs               List all the available runs
  --configurations     List all the available acquisition configurations
  --asic-info          print petiroc asic file for a given --state and --version
  --fpga-info          print fpga file for a given --state and --version
  --upload             Upload a new state given --state and a given --comment, with --feb #id, --fpga-file and --asic-file
                       specified
  --acq-upload         Upload a new acquisition configuration, with a given --comment and --config-file specified
  --scurves            Download the last SCURVE test for --state and --version --feb #id, --analysis (SCURVE_1 or SCURVE_A)
                       and --asic (LEFT_BOT..). Optionnaly --out #jsonfile can be given
  --download           download the state specified in --state=state --version=version
  --acq-download       download the acquisition specified in --name=state --version=version
  --state STATE        DB State
  --version VERSION    DB state version
  --feb FEB            FEB ID
  --fpga-file FPGADEF  FPGA default file
  --asic-file ASICDEF  PETIROC default file
  --file CONFIG_FILE   acquisition configuration file
  --comment COMMENT    Comment
  --param PARAM        Parameter name
  --analysis ANALYSIS  Analysis name
  --asic ASIC          Asic name
  --name NAME          Configuration name
  --out OUT            Output file name
Examples
List of all states
$ febdbtool --states
FEBV330_V48 / 1 | state with one FEB v3 (FPGA 4.8) (30) for Dome Test CCOMP 10 DELAY 4 No PF No Mitig No pedestal | Previous  0
FEBV330_V48 / 2 | Pedestal adjusted | Previous  1
FEBV330_V48 / 3 | time pedestal | Previous  2
FEBV330_V48 / 4 | Paire filtering and Mitigation (3/4/11) | Previous  3
FEBV330_V48 / 5 | Shift DAC by -2 for strip 0 & 1 | Previous  4
FEBV330_V48 / 6 | All 3 TOP asic shifted by +3 | Previous  5
FEBV330_V48 / 7 | Redo pedestal with ax7325 | Previous  1
FEBV330_V48 / 8 | Time aligned | Previous  7
FEBV330_V48 / 9 | Paire filtering and Mitigation (3/4/11) | Previous  8
FEBV330_V48 / 10 | Un test au mois d'cotobre | Previous  2
FEBV330_V48 / 11 | Second round of pedestal to  test | Previous  7
Download a version
febdbtool --download --state FEBV330_V48 --version 20
/dev/shm/feb_csv/FEBV330_V48_20_f_30_config_fpga.csv created for FPGA
/dev/shm/feb_csv/FEBV330_V48_20_f_30_config_petiroc.csv created for PETIROC
Files are stored in /dev/shm/feb_csv directory.
List calibration tests
febdbtool --tests
2026-02-12 16:55:08|1061|FEBV330_V48/18/SCURVE_1|30|LEFT_TOP|oops
2026-02-12 16:58:30|1062|FEBV330_V48/18/SCURVE_1|30|LEFT_TOP|oops
2026-02-12 16:59:33|1062|FEBV330_V48/18/SCURVE_1|30|LEFT_BOT|oops
2026-02-12 17:01:06|1064|FEBV330_V48/18/SCURVE_A|30|LEFT_TOP|oops
2026-02-12 17:02:35|1065|FEBV330_V48/18/SCURVE_A|30|LEFT_TOP|test de la sauvegarde
2026-02-12 17:02:39|1065|FEBV330_V48/18/SCURVE_A|30|LEFT_BOT|test de la sauvegarde
2026-02-12 17:02:44|1065|FEBV330_V48/18/SCURVE_A|30|MIDDLE_TOP|test de la sauvegarde
2026-02-12 17:02:49|1065|FEBV330_V48/18/SCURVE_A|30|MIDDLE_BOT|test de la sauvegarde
2026-02-12 17:02:54|1065|FEBV330_V48/18/SCURVE_A|30|RIGHT_TOP|test de la sauvegarde
2026-02-12 17:02:59|1065|FEBV330_V48/18/SCURVE_A|30|RIGHT_BOT|test de la sauvegarde
2026-03-13 15:36:49|FEBV330_V48/18/TIME_PEDESTAL|30|LEFT|test de la calibration des TDCs
2026-03-13 15:36:49|FEBV330_V48/18/TIME_PEDESTAL|30|MIDDLE|test de la calibration des TDCs
2026-03-13 15:36:49|FEBV330_V48/18/TIME_PEDESTAL|30|RIGHT|test de la calibration des TDCs
List runs
febdbtool --runs
Fri May  5 10:59:25 2023 dome_cms 1009 Setup dome_cms|Acquisition from /dev/shm/config/acquisition_test_1.json
Fri May  5 11:56:37 2023 dome_cms 1010 Setup dome_cms|Acquisition from /dev/shm/config/acquisition_test_1.json
Fri May  5 12:42:29 2023 dome_cms 1011 Setup dome_cms|Acquisition from /dev/shm/config/acquisition_test_1.json
Fri May  5 12:44:46 2023 dome_cms 1012 Setup dome_cms|Acquisition from /dev/shm/config/acquisition_test_1.json
Tue May 16 16:24:38 2023 dome_cms 1013 Setup dome_cms|Acquisition from /home/acqilc/local_fc7_config.json
Tue May 16 16:29:24 2023 dome_cms 1014 Setup dome_cms|Acquisition from /home/acqilc/local_fc7_config.json
Tue May 16 16:30:46 2023 dome_cms 1015 Setup dome_cms|Acquisition from /home/acqilc/local_fc7_config.json
List acquisition configuration
febdbtool --configurations
Thu May  4 16:13:41 2023 1 acquisition_test un essai de stockage
Thu May 11 10:43:18 2023 1 acquisition_shm acquisition shm with trigger section
Thu May 11 10:54:31 2023 2 acquisition_shm acquisition shm with trigger section
Thu May 11 11:39:37 2023 3 acquisition_shm acquisition shm with trigger section n_data 512
Fri May 12 10:48:13 2023 4 acquisition_shm Buffer size to 58900, DB FEB TEST_INSERTION 13
Tue May 16 17:20:41 2023 1 acquisition_local Acquisition locale
Wed Feb 11 11:50:49 2026 1 TEST_CALIB_DOME channel per channel
Wed Feb 11 11:51:15 2026 2 TEST_CALIB_DOME oops
Mon Feb 23 15:55:46 2026 3 TEST_CALIB_DOME Version d'alignement
Mon Mar 16 11:50:50 2026 1 TEST_TIMING_DOME A partir de la version 22
Acquisition configurations are JSON files that can be download with acq-download option.
Files are stored in /dev/shm/config/ directory
Graphical User interface
Sequences of commissioning
The details of each procedure and the exact meaning of each parameters are given bellow.
Before being able to acquire cosmic data, it is necessary to perform the following commissioning sequence:
-
Create a database state for the FEB with the default parameters (version 1)
-
Calibrate and adjust pedestals of each PETIROC channel
-
Make a rough scan of the pedestal with all channels activated (SCURVE_A) to find the limit of the deviation of channel (
thminandthmax) -
Make an alignment run (ALIGN mode) with the previous boundaries. It will create a new version (2) of the state with channel DAC corrected.
-
Verify pedestals with version 2 , individual channels activated (SCURVE_1) and all channels activated (SCURVE_A)
-
Align TDC channels
-
Align TDC channels offsets (TIMING) and update the state for a new version (3)
-
Verify channel alignment without updating the database (tag
correct=0) -
Activate pair filtering with correct limits and the re-triggering mitigation (version 4)
-
This step does not correpond to an acquisition procedure but is mandatory to oeprate in conditions analog to those that are used in a normal physic.
Then the FEB can be operated in normal cosmic data taking with this version 4.
Usage
The graphical user interface is launch with the following commands:
- First all the environment variables and running environment should be defined if not done in .bashrc:
source daq_env.sh
- Then launch the program:
bash
  daqui.py
Basics
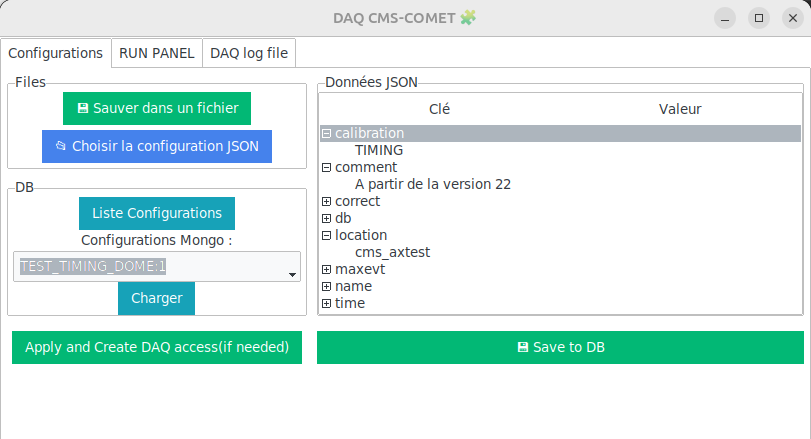
The whole acquisition is controlled by JSON configurations that are either stored in a file or in the MongoDB. Left buttons of the Configurations panel allow to choose the configuration:
-
Choisir la Configuration JSON: Choose a configuration file -
Sauver dans un fichier: Save the current configuration to a file -
Liste Configurations: Load the list of configurations from MongoDB database -
Charger: Load the selected DB configuration from MongoDB database
One a configuration is selected and loaded it is accessible in the Donnees JSON Tree view. Clicking on one item gives access to its value and Double-Clicking open a widget to modify it.
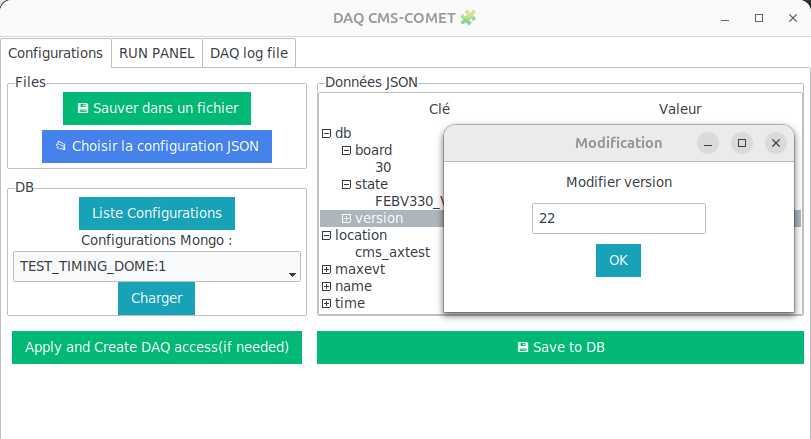 The last 2 buttons are:
-
Save to DB: Allows to save the Tree view content to a DB acquisition configuration -
Apply and Create DAQ access: It creates the DAQ python objects with the parameters accessible in the Tree view.
Acquisition configurations
The acquisition configurations control the different procedures. There are 3 types:
-
S-Curves : It allows to make the pedestal alignment, S-Curves per channel and S-Curves with all channels activated.
-
Timing : Configuration for Tdc channels offset adjustment
-
Cosmic runs : The configuration for normal data taking.
S-Curves
SCurves are the channel responses to a scan of the PETIROC 10bit DAC threshold. It gives the pedestal and the minimal threshold that can be used for the operation.
Since this 10bit threshold is unique for the chip, individual adjustment is done at channel level with 6bit DAC .
An example of JSON configuration file for SCurves is:
{
  "calibration": "ALIGN",
  "comment": "oops",
  "db": {
    "board": 30,
    "state": "FEBV330_V48",
    "version": 18
  },
  "location": "cms_axtest",
  "name": "TEST_CALIB_DOME",
  "thmax": 360,
  "thmin": 240,
  "thstep": 1,
  "time": "2026-02-23_15-05-16",
  "version": 2
}
where
-
calibration: is the type of S-Curve -
ALIGN : Make an alignment of all pedestal S-Curves with the help of the DAC 6bits of each channels. The
dbtag gives the initial DB state used, a new version will be created with the 6bit DAC values update and a comment given by thecommenttag -
SCURVE_1 : construct S-Curves activating each channel separately. Data are stored in the test collection in the DB with the
commentgiven. -
SCURVE_A : identical to SCURVE_1 but all channels are activated simultaneously. It gives a snapshot of the pedestal in normal conditions
-
comment: The comment to be set in the databasetestscollection. If not provided no upload is achieved. -
db: Defines the DB state and board to use -
location: experiment name, used to get a unique run number from the DB. -
name/version: Name and version of the configuration -
thmin: Minimal DAC 10-bit value in the scan. -
thmax: Maximal DAC 10-bit value in the scan. -
thstep: Step of DAC 10-bit value in the scan.
Timing
The timing adjustment consists of injecting an external trigger to all PETIROC ASICs in parallel and measure the TDC channels shifts. Here is an example of a TIMING scan configuration:
{
  "calibration": "TIMING",
  "comment": "A partir de la version 21",
  "correct": 0,
  "db": {
    "board": 30,
    "state": "FEBV330_V48",
    "version": 21
  },
  "location": "cms_axtest",
  "maxevt": 200,
  "name": "TEST_TIMING_DOME",
  "time": "2026-03-16_12-34-21"
}
The parameters are identical to these used for SCurves runs. The only specific parameters are:
-
maxevt: The 8-bits number of events used to calculate the mean time per channel. -
correct: If it is set to one new ts_offset are calculated for all channels aligned to the first one and the data base is updated with an incremented version number and the comment specified in the tagcomment
2026-03-20: For the moment, the DB correction cannot be applied recursively (bug in daq software not yet fixed), so make an upload only once (from TS_OFFSET at 0 ) and verify the alignment with correct=0
Cosmic runs
For normal data taking, additional information are needed. They are all given in thedaq section of the configuration.
- config
mapping defines the trigger and clock mapping of the ax7325. It can take 2 values "lemo" or "hdmi" (only used in Lyon). The other parameters are fixed and should not be modified
-
db_state, db_version,feb_id : It is the identifier of database state and feb to use
-
location : It is the experiment name that will define the run number
-
logging : Logging level
-
orbit_fsm: Here are the length in 25 ns steps of the LHC orbit based FSM mechanism
-
disable_force_s2 , trigger :Do not modify
-
vth_shift : IMPORTANT. It is the DAC 10-bits to apply to each PETIROC asic threshold stored in the database. In the database the current threshold stored after alignment is the mean pedestal so this shift should be at least 7 .
-
writer:
detector_idis fixed to 191,source_idcan be set to the desired value (typically the FEB number). Thefile_directoryis the directory where data are written in binary format. The other parameters are not used currently.
{
    "daq": {
        "config": {
            "mapping":"lemo",
            "buf_size":30000,
            "external_window": 0,
            "keep": 0,
            "single": 0,
            "triggerless": 0,
            "resync_delay":5
        },
        "db_state": "COMET_V1",
        "db_version": 4,
        "feb_id": 10,
        "gbt_init": 1,
        "location": "comet_axtest",
        "logging": "DEBUG",
        "orbit_fsm": {
            "s0": 3560,
            "s1": 106,
            "s2": 10,
            "s3": 5,
            "s4": 5
        },
        "disable_force_s2":0,
        "trigger": {
            "external": 3500,
            "n_bc0": 0
        },
        "vth_shift": 15,
        "writer": {
            "detector_id": 191,
            "file_directory": "/home/acqilc/data/",
            "location": "comet_axtest",
            "shm_directory": "/dev/shm/feb_data/",
            "source_id": 10
        }
    },
    "name": "comet_daq",
    "version": 1
}
Calibration S-Curves
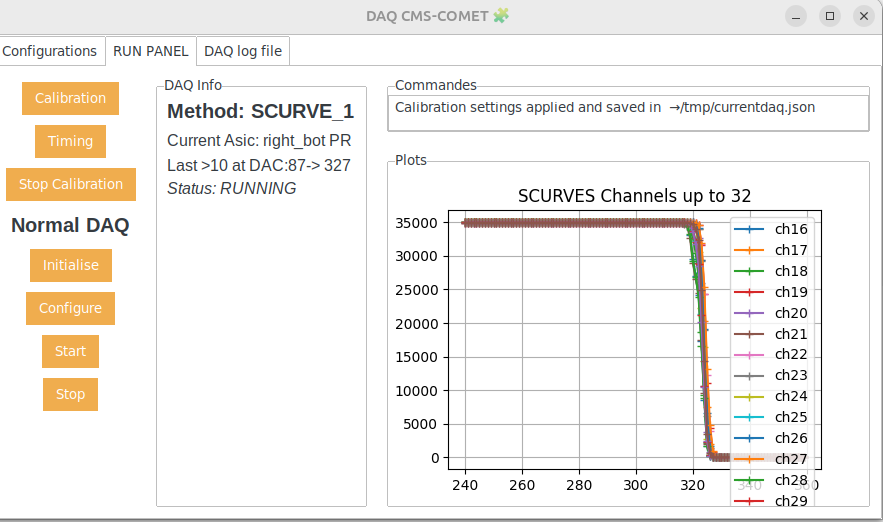
The following picture shows the Run Panel at the end of a Calibration call. The Stop calibration button is optional and can be used to stop a running calibration.
The DAQ log file panel is just the tail of the acquisition log file
Calibration: Timing
For the timing alignment , just Click the Timing button. The run is really fast and data are stored in the DB.
The final results are for the moment showed only in the terminal where the GUI is launched. For example for an already aligned state it gives the following shifts:
Getting time pedestals for RIGHT from analysis TIME_PEDESTAL on FEBV330_V48/21
FEBV330_V48 21 30 TIME_PEDESTAL RIGHT None
 aligned to channel lowest time[33]: 50942.0
Channel    LEFT       MIDDLE     RIGHT
0          1          -2         5
1          -1         -1         4
2          -1         -1         0
3          -1         1          5
4          8          0          8
5          -1         -4         0
6          1          -2         3
7          4          -2         1
8          1          -3         2
9          5          1          8
10         5          0          3
11         -1         -2         1
12         2          -1         5
13         2          -2         1
14         2          1          3
15         7          -1         7
16         5          3          7
17         3          -1         4
18         2          1          2
19         3          -1         4
20         7          4          6
21         3          -1         4
22         3          1          4
23         7          -2         7
24         4          3          6
25         5          1          4
26         -1         -5         2
27         4          -1         4
28         4          -2         4
29         2          0          3
30         3          -1         5
31         0          -1         1
32         0          0          0
33         0          0          0
0          1          0          1
1          -1         3          -4
2          -1         2          -3
3          -1         4          -5
4          8          4          4
5          -1         -1         0
6          1          5          -4
7          4          4          0
8          1          7          -6
9          5          3          2
10         5          3          2
11         -1         7          -8
12         2          3          -1
13         2          2          0
14         2          3          -1
15         7          5          2
-1.3125
0          -2         -1         -1
1          -1         -1         0
2          -1         0          -1
3          1          -2         3
4          0          -1         1
5          -4         -5         1
6          -2         1          -3
7          -2         3          -5
8          -3         -2         -1
9          1          1          0
10         0          -1         1
11         -2         4          -6
12         -1         -1         0
13         -2         1          -3
14         1          -1         2
15         -1         3          -4
-1.0
0          5          1          4
1          4          5          -1
2          0          3          -3
3          5          4          1
4          8          4          4
5          0          2          -2
6          3          4          -1
7          1          6          -5
8          2          7          -5
9          8          4          4
10         3          4          -1
11         1          6          -5
12         5          4          1
13         1          2          -1
14         3          4          -1
15         7          7          0
-0.6875
Normal data taking with scintillators
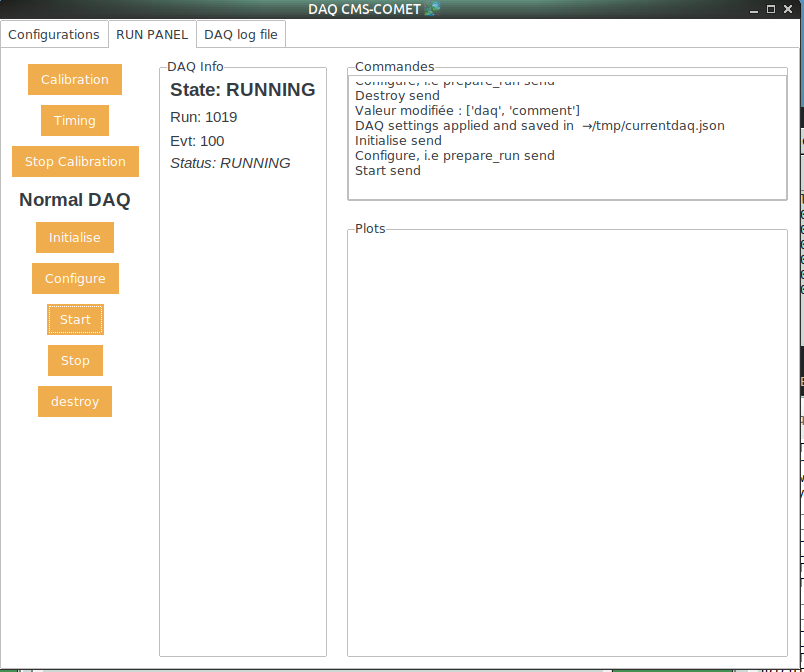
For a physic run with scintillators coincidence, you should follow the usual Finite State Machine:
INITIALISECONFIGURESTART(orCONFIGURE)STOPDESTROY
If parameters needs to be modified before next run, the following procedure should be done:
-
DESTROYthe current DAQ, -
Go to the configuration panel
-
Change parameter (and comment) in the Tree viewer
-
Applychanges -
in Run Panel, restart from
INITIALISEbutton